Showing posts with label Static. Show all posts

Saturday, January 22, 2011

How to Make a Glittery Name Using Static

Step 1: Start Gimp

Step 2: Go to File and click on New or press ctrl+n. Make the width 300px and the height 100px. Click OK.


After you clicked Ok this should have appeared:


Step 3: Now we are going to add some text. Click on the Text Tool which is the A icon in your toolbox. Click and drag the text box onto the 300x100 box. A window should pop up: this is where you will type in your text. Pick a font and a color for your text. You can type anything you want and use whatever font as long as it fits in the box.


The font I used is called Ithornët and you can download it for free at http://www.dafont.com

Font color: b7b734


Step 4: Go to Image and click on Flatten Image.


Step 5: Now we are going to make the background transparent. Go to layer and click on Color to Alpha. A window should pop up. If the preview shows that the background is already transparent then just click OK. If not click on the colored box where it says From: (Box here) to alpha. Another window should pop up. Type in "ffffff"(white) where it says HTML notation. Then click OK. Instead of having a white background you should see a gray checkered pattern (this means it no longer has a background).


Step 6: Click on the Fuzzy Select Tool (looks like a wand) and make sure you use mode 2. Then click on your text. Make sure every letter that you want to have glitter is selected.


Step 7: Next we will need to create at least 2 more layers. Go to Layer and click on Duplicate Layer. Do it again so that you have a total of 3 layers. Or if you want you can press shift+ctrl+d two times.


Step 8: Time to add the static! Go to Filters, Noise and click on HSV Noise...A window should pop up. It's best to mess with the settings until you get the effect that you prefer. When you are done click OK.

These are my settings:

Holdness: 3
Hue: 0
Saturation: 106
Value: 134


Step 9: Click on the next layer which should be called Background Copy. It should now be highlighted in gray. Then repeat Step 8 but this time change the value one number lower. In my case it would be 133.


Step 10: Next click on the last layer which should be called Background. Repeat step 8 again but this time change the Value one number less than the previous one. In my case it would be 132.

Step 11: Let's see how it turned out! Go to Filters, Animation and click on Playback. A window should pop up with your glitter. Click Play. When you are done viewing your glitter close the window.

Saving: To save your glitter go to File and click on Save as or press shift+ctrl+s. A window should have popped up. In the box that says "Name" erase where it says "Untitled" and put the name you want for your glitter and add .gif to the end. I'm going to use "alyssagoldglitter.gif" Just make sure .gif is at the end! Click Save when you are done.


After you clicked Save a window should have appeared. Click on the circle that says Save as Animation. If you don't do this your image will be flattened. Then click Export and then another window will appear where you will click Save.


You're done!!!


Here is my result:

How to Make an Image Glittery Using Static

Ever see those glittery images on someone's profile like myspace? Well keep on reading to learn how to make them!

In this tutorial we are going to create a glittery effect using static. (Yes, like the static you see on your tv. Trust me, it will come out looking great!)

Before:

Image taken from: http://www.thesugarband.co.uk/

After:


Step 1: Save the Before Image Above to your computer and Start Gimp.

Step 2: Go to File+Open... and then find the rose image you saved and click open.

Ex.

Step 3: You should see this now:


Step 4: Click on the Fuzzy Select Tool in your toolbox.

This one:

Step 5: Now we are going to select the area we want to be glittery (the rose) using the Fuzzy Select Tool. Before we start, click on the second mode icon that says Add to the Current Selection. Now you can start clicking all over the rose petals. Select any part of the area that is a shade of red.

Ex.


Step 6: In order to make an image appear glittery you need at least 3 layers. So go to Layer and click on Duplicate Layer. Now go to Layer and click on Duplicate Layer again. Or hold down shift+ctrl+D at the same time 2 times.

Ex.


You should now have 3 layers (1 original and 2 copies).

Your screen should look like this:

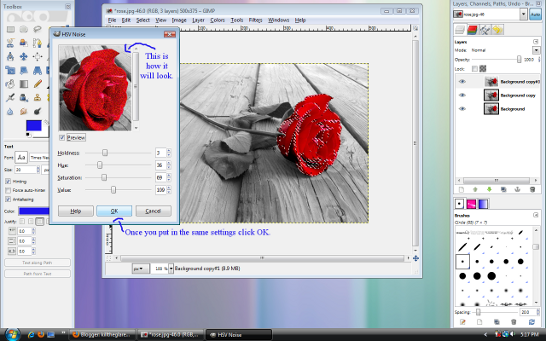
Step 7: Time to add the static! Go to Filters,Noise and click on HSV Noise.


When you clicked on HSV Noise, a window should have popped up. If it didn't, try clicking on it again.

When you use the HSV Noise option you get to pick your own settings! It helps just to mess around them to get the effect you want. However, since we are trying to recreate the example above of the glittery rose let's use the same settings.

Holdness: 3
Hue: 36
Saturation: 69
Value: 109

Once you put in the settings click OK. Your rose should have static on it now.


Step 8: Now it is time to apply static to the other 2 layers! First click on the second layer (Background copy).


Now do what you did in Step 7 but change the value setting to 108. Did you see the static in the preview change? That means you did it right! If you weren't paying attention but still used 108 I'm sure you did it right. :) Click OK.

Step 9: Almost done! Click on the last layer titled Background. It should be highlighted. If it isn't, click on it again. Now it's time to repeat Step 7 again. Go to filters, noise and then click on HSV Noise. This time we will change the value to 107. Click OK.


Step 10: Let's see what it looks like now with all 3 layers animated. Go to filters, animation and click on playback.


A window should have popped up with your image in it. Click play and watch what you created! Does it look like mine or somewhat similar? If so, good job! Close the pop up window because it's time to save your glitter!


Saving: Go to File and click on Save as or click on shift+ctrl+s. A window should have popped up. In the area where it says name erase whatever is there and type in rose.gif (or whatevernameyouwant.gif) Just make sure .gif is at the end! Click Save when you are done.


After you clicked Save a window should have appeared. Click on the circle that says Save as Animation. If you don't do this your image will be flattened. Then click Export and then another window will appear where you will click Save.


You're done!!!


You can use these same steps when trying to add glitter to a different image! Just remember you don't have to use the same static settings as I did!

Good luck!